Introduction
Garage door weatherstripping is one of the simplest upgrades that can make a garage feel cleaner, quieter, and easier to keep comfortable. In Seattle, frequent rain, wind, and damp air can find their way through small gaps around the door, leading to drafts, water intrusion, and debris along the edges. This guide breaks down the main sealing options and how they work together: the garage door bottom seal, a threshold seal on the floor, and perimeter seals along the jambs and header. You will also learn how to spot common leak points, choose materials that suit your garage, and plan a straightforward garage door seal replacement when your current seals are worn out.
- Bottom seals block gaps at the base of the door as it closes against the floor
- Threshold seals add a raised barrier on the slab to help manage water and wind
- Perimeter seals close the sides and top, where many drafts actually start
- The best results come from combining seals and fixing alignment issues first
- Replace weatherstripping when it hardens, cracks, shrinks, or no longer compresses evenly
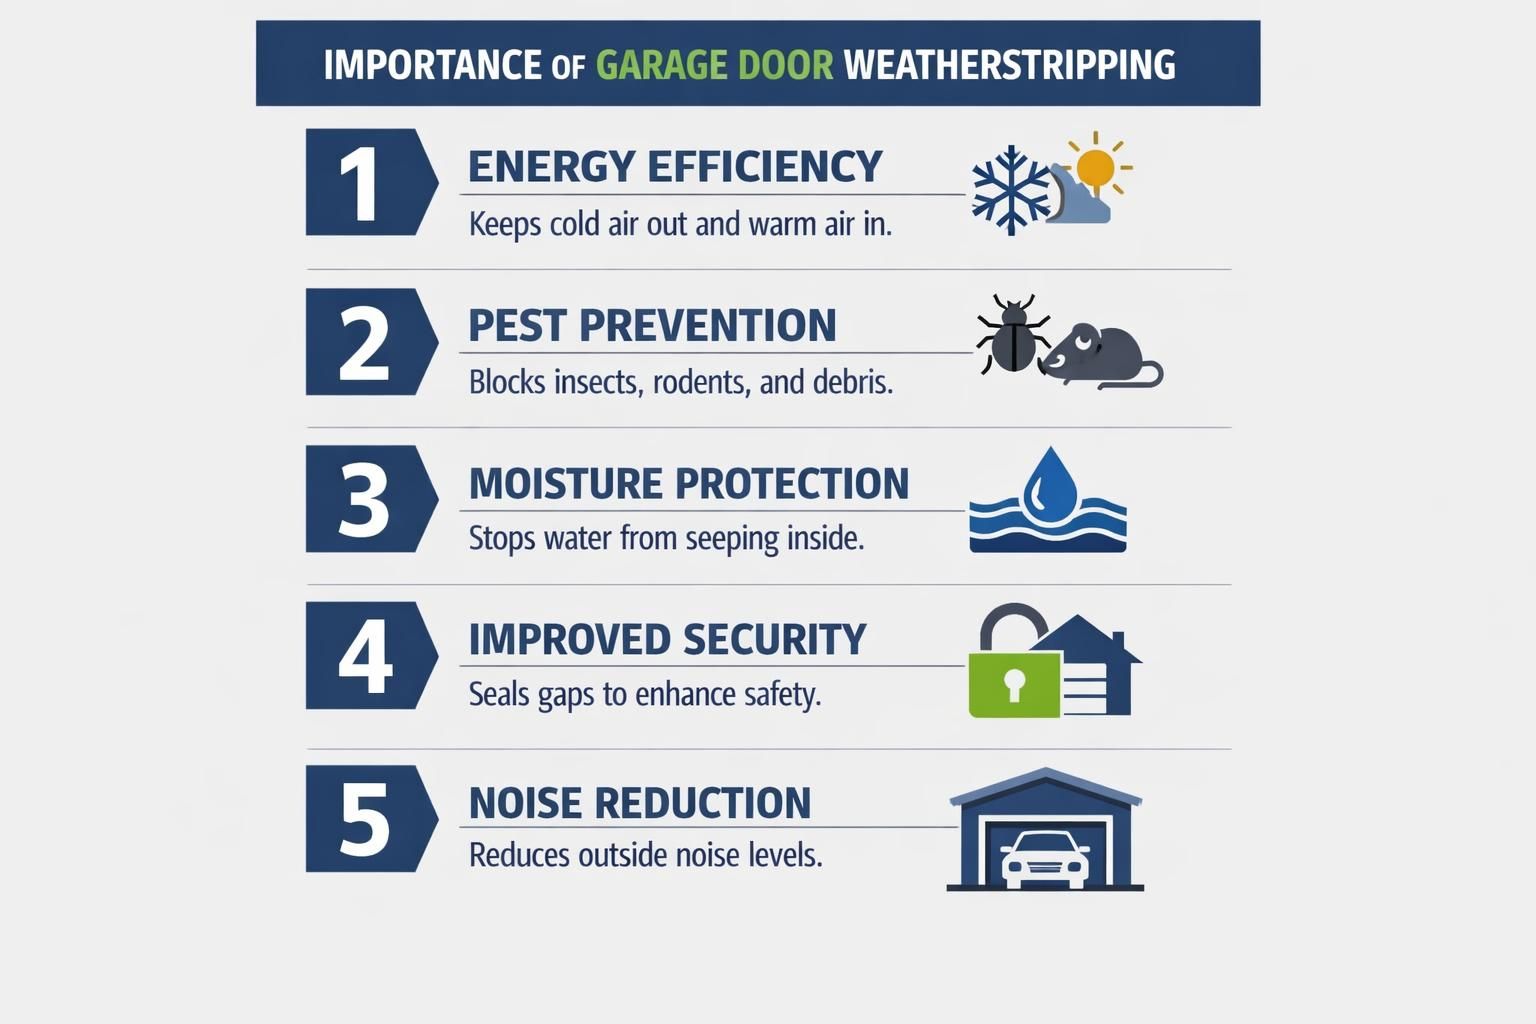
Importance of Garage Door Weatherstripping
Weatherstripping does more than reduce cold air. It helps keep wind driven rain from blowing under and around the door, which matters in a wet climate. Sealing also reduces dust, leaves, and pests that use tiny openings as entry points. If your garage shares a wall with living space, better sealing can improve comfort in adjacent rooms by limiting air movement through the garage.
Another benefit is day to day usability. A well sealed door tends to rattle less and closes with a more consistent feel because the seals cushion contact points. It also helps protect items stored near the edges of the garage from moisture and grime. Weatherstripping will not fix a failing door system, but it is a high impact way to address common nuisance problems.
Overview of Types of Weatherstripping
Most garages use three categories of seals working together. First is the garage door bottom seal, a flexible strip attached to the bottom of the door that compresses against the floor. Second is perimeter weatherstripping, often called stop molding or side and top seals, installed on the door frame to close gaps along the jambs and header.
Third is a threshold seal, a raised strip adhered to the concrete or floor surface beneath the door. Thresholds are especially useful where the slab slopes toward the door or where wind pushes water inward. In practice, you get the best sealing when the door is properly aligned and the seals are chosen to match the size and shape of the gaps, rather than forcing one product to do everything.
Weatherstripping does more than reduce cold air. It helps keep wind driven rain from blowing under and around the door, which matters in a wet climate. Sealing also reduces dust, leaves, and pests that use tiny openings as entry points. If your garage shares a wall with living space, a garage door consultation can improve comfort in adjacent rooms by limiting air movement through the garage.
Garage Door Bottom Seal
Another benefit is day to day usability. A well sealed door tends to rattle less and closes with a more consistent feel because the seals cushion contact points. It also helps protect items stored near the edges of the garage from moisture and grime. Weatherstripping will not fix a failing door system, but it is a high impact way to address common nuisance problems related to garage door installation cost.
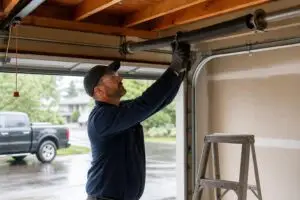
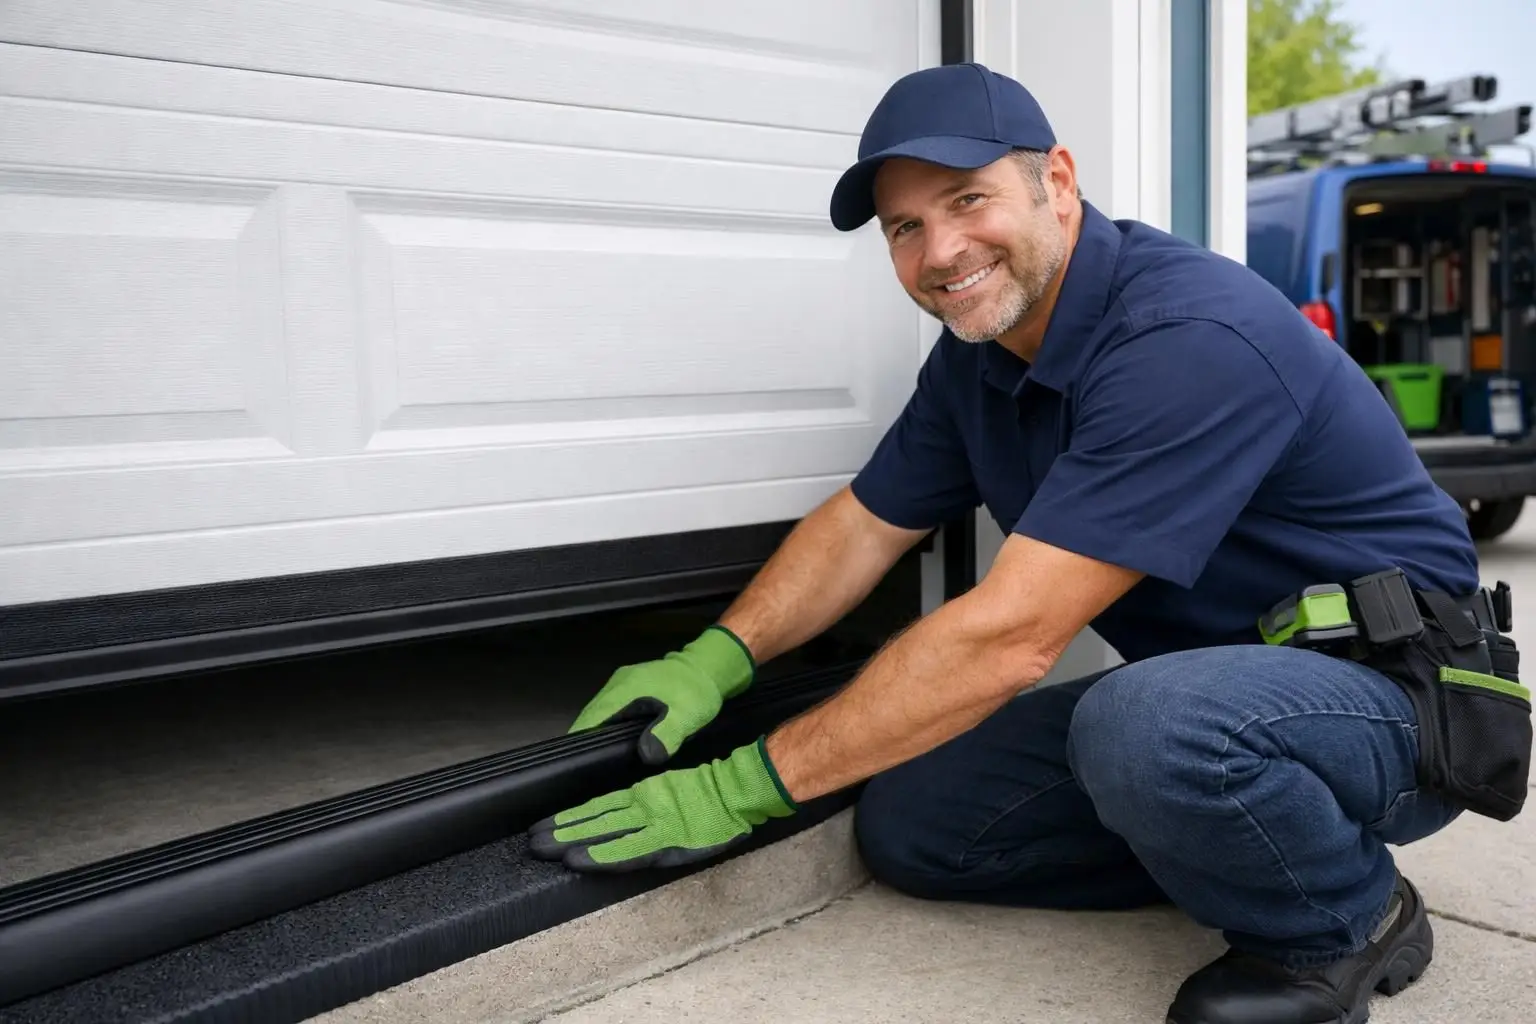
A bottom seal is usually the first component people replace because it is easy to see and takes the most abuse. It drags against gritty concrete, compresses thousands of times, and is exposed to moisture. Over time it can flatten, tear, or stiffen, leaving a visible line of light under the door.
Before choosing a replacement, check the door’s bottom retainer style. Some doors use a metal track that the seal slides into, while others use a nail on or screw on retainer. Also look at the floor: uneven slabs may require a larger, more flexible profile so it can compress into low spots without needing excessive door pressure.
What is a Garage Door Bottom Seal?
Most garages use three categories of seals working together. First is the garage door bottom seal, a flexible strip attached to the bottom of the door that compresses against the floor. Second is perimeter weatherstripping, often called stop molding or side and top seals, installed on the door frame to close gaps along the jambs and header, which can vary depending on the types of garage doors.
A garage door bottom seal is a flexible strip, commonly rubber or vinyl, that mounts to the bottom edge of the door. Its job is to compress against the floor when the door closes, blocking air, water, and debris. Many designs have a dual fin or bulb shape to increase contact area and maintain a seal even if the floor is slightly uneven.
The key idea is compression, not just contact. If the seal barely touches the floor, it will leak. If it is overly compressed, it can cause the door to reverse or strain the opener. The right fit creates an even seal across the entire width with minimal resistance, while still allowing the door to close smoothly.
Benefits of Installing a Bottom Seal
Installing a garage door bottom seal helps stop garage door drafts at their most obvious entry point. It can also reduce the amount of water that sneaks in during heavy rain, especially when wind drives water toward the door. If you notice dirt lines or leaf buildup along the interior edge, a new bottom seal typically makes an immediate difference.
It also helps with pests. While a determined rodent can chew, a snug bottom seal reduces the easy gaps that insects and small critters use. For garages used as workshops, sealing the bottom edge can cut down on fine dust and improve the overall feel of the space, particularly during windy weather.
Threshold Seal
A threshold seal is often misunderstood as redundant, but it solves a different problem than the bottom seal. Instead of being attached to the door, it sits on the floor and creates a defined barrier the bottom seal compresses against. This can be helpful when the concrete is pitted, cracked, or slightly uneven.
In rainy conditions, thresholds can also guide water. Many are designed with a raised center ridge that discourages water from blowing inward and encourages it to remain outside. They are not a substitute for good drainage or a properly sloped slab, but they can reduce minor water intrusion in common real world conditions.
Understanding Threshold Seals
A threshold seal is a long, low profile strip adhered to the garage floor near the door opening. When the door closes, the bottom seal presses onto the threshold, creating a more reliable seal surface than raw concrete. Adhesion depends on a clean, dry slab, so prep is as important as the product.
Thresholds come in different heights and shapes. A taller threshold can help with small water events, but it may create a trip edge or interfere with rolling items in and out. When selecting a threshold seal, aim for the smallest height that still provides a consistent contact surface and water resistance for your specific gap and floor condition.
How Threshold Seals Complement Bottom Seals
Bottom seals and threshold seals work best as a pair. The bottom seal provides flexibility and movement with the door, while the threshold provides a stable landing surface that improves compression. This combination is especially useful if the door closes over a slightly crowned or uneven slab, where a bottom seal alone might leave small gaps.
To avoid issues, ensure the door closes fully without excessive force. If the opener struggles or the door reverses, you may need a lower threshold profile or an adjustment to door travel limits. Done correctly, the pair can significantly reduce drafts and moisture while keeping the door’s operation smooth and predictable.
Tips to Stop Garage Door Drafts
If you want to stop garage door drafts, start with observation, not shopping. Drafts can come from the bottom, but many come from the sides and top where perimeter seals have hardened or pulled away. On windy days, you can often feel airflow along the jambs, particularly near corners.
It also helps to rule out mechanical causes. A door that is out of square, has worn rollers, or has a bent track may not seal evenly even with new weatherstripping. Addressing alignment and ensuring the door sits evenly in the opening prevents you from replacing seals only to find the same gaps remain.
Installing a garage door bottom seal helps stop garage door drafts at their most obvious entry point. It can also reduce the amount of water that sneaks in during heavy rain, especially when wind drives water toward the door, making it essential to know how to prepare your garage door for winter. If you notice dirt lines or leaf buildup along the interior edge, a new bottom seal typically makes an immediate difference.
Identifying Common Draft Areas
The fastest way to find problem areas is to look for daylight. With the garage darkened, check around the sides, top, and bottom for thin lines of light. You can also use a hand to feel for moving air on a breezy day, paying attention to the lower corners where gaps often form first.
Common draft points include:
- The bottom corners where the floor is uneven or the seal is torn
- The side jambs where perimeter seals have curled or flattened
- The top header where the seal no longer touches the door when closed
- Gaps caused by door sagging or an opener setting that stops short
Once you know where the air is coming in, you can choose targeted fixes instead of overbuilding one area.
Selecting the Right Weatherstripping Materials
Material choice affects durability and sealing quality. Rubber tends to stay flexible and can handle compression well, while some vinyl seals can stiffen over time, especially in exposed conditions. For Seattle’s damp environment, prioritize seals that maintain flexibility and resist cracking, and consider how often the seal will contact wet concrete.
Also match the profile to the gap. A very small gap may only need a narrow bulb perimeter seal, while larger gaps may require a thicker profile. When shopping for garage door weatherstripping, bring measurements of the largest gap points and identify your door’s bottom retainer type so the replacement fits correctly.
Also match the profile to the gap. A very small gap may only need a narrow bulb perimeter seal, while larger gaps may require a thicker profile. When shopping for garage door weatherstripping, bring measurements of the largest gap points and identify your door’s bottom retainer type so you understand the cost of garage door repairs correctly.
Garage Door Seal Replacement
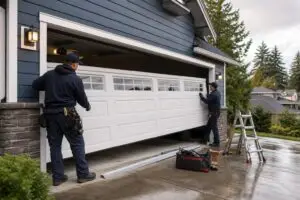
Garage door seal replacement is usually a weekend level project, but it goes better when you plan it. Replacing the bottom seal often requires loosening the retainer ends and sliding the old seal out, which can be easier with the door partially open and supported safely. Perimeter seals may require removing old fasteners and aligning new material so it compresses evenly.
It is also worth replacing strategically. If the bottom seal is new but the side seals are hard and brittle, you may still feel drafts. Doing a full perimeter check and replacing the most worn components first can produce noticeable results without unnecessary work.
When to Replace Your Weatherstripping
Replace weatherstripping when it no longer returns to shape after compression, shows cracking, or has visible gaps when the door is closed. If you see light at the bottom even with a new looking seal, the issue may be door alignment or an uneven floor, which might call for a threshold seal or adjustments.
Other signs include increased rattling, water marks near the opening, and debris collecting just inside the door. If the seal has shrunk and pulled away at corners, replacement is typically more effective than patching. Choosing the right profile and installing it straight usually solves repeat problems.
Step-by-Step Guide to Garage Door Seal Replacement
Start by confirming which components you are replacing: bottom seal, perimeter seals, or a threshold. Then gather basic tools and plan for safe door positioning. If anything about the door’s operation seems unsafe or unstable, address that before working near the opening.
A practical sequence:
- Clean the area: remove dirt along the floor and wipe the door’s bottom edge and jambs
- Measure and identify: confirm the bottom retainer type and measure the door width and gap areas
- Replace the bottom seal: remove end fasteners if needed, slide the old seal out, lubricate lightly if appropriate, and slide the new seal in, then resecure ends
- Replace perimeter seals: remove old stop molding or seals, align the new seal so it lightly compresses when closed, and fasten evenly
- Add a threshold seal if needed: dry fit placement, prep the slab thoroughly, apply adhesive, and press in place
- Test and adjust: close the door, check for even contact and daylight, and confirm the opener does not strain or reverse
Work slowly at corners, where small misalignments often create persistent leaks.
Conclusion
A well sealed garage starts with understanding where air and water are getting in, then choosing the right mix of bottom, threshold, and perimeter solutions. In many cases, pairing a garage door bottom seal with a threshold seal creates a reliable barrier at the floor, while fresh side and top seals address the drafts you feel most on windy days. If you notice cracks, stiffness, or visible light around the door, plan a garage door seal replacement before the next stretch of wet weather. The best next step is simple: inspect for daylight, measure your gaps, and replace the specific garage door weatherstripping components that are no longer compressing evenly.